Finishes
I have decided to keep my research into print finishes specific as the print production manual is for me i decided to look at print finishes that i have interest in using and what i find aesthetically pleasing as i enjoy publication and editorial designs i have decided i would look into different binding methods analysing what the positives and negatives are and what uses they have and even the costing for each. This is going to be highly beneficial for me as i will be able to look back and select a method that will be a perfect selection for the job.
Bookbinding is the process of physically assembling a book from a number of folded or unfolded sheets of paper or other material. It usually involves attaching a book cover to the resulting text-block.
Binding - Different styles.
All images are sourced from:
http://www.prssproof.com/Graphics_Library/bindery/binderymethods.html

The book is punched with a number of holes along the left margin a coil binding is then screwed through the holes from one end of the book to the other. The binding may be made of either plastic wire or and allow the printed document to lie flat and to double over. Spiral wire coils range from 1/4 of an inch to 2 inch diameter and can bind books of up to 24 inches in length.
Uses:
Technical Manuals
Presentations
Notebooks
Calendars

This is one of the cheapest options when it comes to binding, however they are usually inserted by hand which can be very costly when created in mass, They are made of light weight plastic that can be used for books up to 3 inches thick. The style allows the pages to lie flat when open, and can be easily add or subtract pages from the book however over time this bind is known for breaking from wear and tear.
Uses
Reports
Presentations
Formal Documents

Saddle Stitch Binding
This bind consists of pages that are folded and inserted into a folded cover, this is then stapled along the foldline in the centre of the book, This is suitable for both self covered books, In general cases, the maximum number of pages is 96this is all dependent of the weight and bulk of the stock used numbers of pages may vary.
Uses
Magazines
Small soft covered books
Brochures

Side Stitched Binding
The pages are trimmed to the same size and stacked, the staple is then inserted down the side of margin of the book 2 - 3 times this is all dependent on the wight of the stock, the result is a sturdy bind, the downside is the book will not lie flat when opened. This bind is generally much cheaper than most other styles
Uses
Notepads
Tear off Calendars
Reports

Case Bound (Section Sewing)
This binding style is typically used for books that consist of more that 80 pages which require a strong, high quality finish. The pages of the book are collated, and then sewn together with thread. the cover is then glued to the spine of the page block. Case bound is generally the most expensive style, so are usually only used for books that must withstand constant use.
Uses
Hardcover Books
Reference Books
Text Books
Novels

Perfect Binding
This is the most common style used for commercially produced books, this is generally cheaper than case bound, with this method the glue is applied to the left edges of the pages, and the cover is then glued to the page block. Perfect Binding is not recommended for books that are in constant use.
Uses
Paperback Books
Large Magazines
User Manuals

Wire O Binding this style of binding holds the pages together by a double look wire that is inserted through holes on the left edge, it does not spiral through the book rather it creates a wire comb. the pages lay flat when opened and can rotate 360 degrees. Wire O bindings are durable, but no not permit printing along the books spine.
Uses
Reference Boks
Reports
Cook Books
Proposals

Post Binding
This style has a cover and back similar to a hardcover book, 2 to 3 screws are used along the left to bind the cover content and spine together. A post binding method can be disassembled and pages can be added or removed at any time.
Uses
Photo Albums
Thesis Papers
Presentations
Summary of finishes available:
Sourced from:
http://www.prssproof.com/Graphics_Library/bindery/binderymethods.html
I have then gone onto use the internet to source information which i have then summarised to then create a sort of definition for i have looked into print finishes that i will be experimenting with in the future and techniques that i feel work effectively in giving a print based design that desired feel making the design stand out amongst the crowd.
There are many different finishes that can be added to the final print job, and again is classed as print finishing being a final procedure.
- Lamination – The most common finish is a lamination. This is where a plastic film is heated onto the paper. The finish can either be a gloss, silk or matt lamination.
- UV Varnish – This is a cheaper alternative to lamination, and is a varnish rather than a film, and gives a high gloss finish.
- Spot uv varnish – This is where perhaps pictures or images are picked out in gloss or matt uv.
- Embossing – This is a raised area, perhaps highlighting a logo or picture.
- Foil Blocking – A technique to apply an image to paper or board using metal foil. This technique is normally used for prestigious literature
Die stamping/Drilling
A die cutter is the most common cutting machine. The die supports the material being cut and has a hole or a recess into which a punch made of cutting blades fits exactly. The punch and die are fitted into a punching machine, or sometimes a converted letterpress machine. The work to be cut is fitted into the machine and the punch lowered down to cut. For creasing, the same technique is used, but with blunt blades that will crease the product.
Die Cutting can be used to produce different shapes on most papers & boards (including thicker display boards). Also most pockets for folders and apertures are achieved using this process. Large areas of dense solid colour can be successfully die-stamped by using a 'screened' or 'sable' die. Screen die permits solids, fine lines and reversed out areas and is a natural choice for logotypes, crests, symbols and stationery. Die stamping really works for multi-colour crests, coats of arms, invitation cards, letterheads and business cards where there is fine detail in the design, the raised three-dimensional aspects brings your work to life. When die-stamping, a design is engraved steel dies and copperplates that are then printed using traditional heavy die-stamping presses.
More points on Die stamping
- Emboss with a second die for extra effect
- Incomparable when used with multicolour crests.
- Matt die-stamping inks make for rich, vibrant colours.
- Laser compatible.
Die-stamping can be used in combination with a combination of other fine print processes this all combined produces designs that are finished to the highest of standards and that reflect high quality.
Information sourced from:
http://www.baddeleybrothers.com/print-techniques/die-stamping
Embossing
I have decided to look at embossing in depth as this is something that i feel is aesthetically pleasing but is something i aim to experiment with during the creation of my print production manual i aim to take what i have learnt from this research and then apply this to my own personal practice i will make sure to document all of y experimentation on my blog.
Embossing gives you the opportunity to enhance your print with stunning 3-D effects. Embossing is particularly effective when used in conjunction with our other processes i.e matt lamination and spot U.V with the spot U.V image embossed out of the lamination or foilblocking and embossing… Let your imagination run wild!
Subtly highlights specific areas by adding a 3D effect. Often used with foiling and laminating.
Embossing is the stamping of a design into paper or card to produce a raised effect, whereas blind embossing uses no ink or foil – the design is only visible as a raised area. Debossing, on the other hand, creates a depression rather than an impression.
Sourced from: www.impressiondp.co.uk
Embossing refers to the process of creating elegant patterns on a paper by using an embossing machine that puts stresses on the paper in order to create a raised or indented affect. The embossing adds a timeless look to prints and when you move your hand over the surface you will be able to feel the fine lines, bumps and patterns on your fingertips.
This type of decorative print finish is commonly seen on wedding invitations, business cards, folder covers and other printed products. Both embossing and foil stamping are done after the printing process. When foil stamping is combined with embossing, dramatic effects can be achieved. Although this type of printing is generally more expensive than normal printing, some printing companies provide the service at surprisingly affordable rates.
Embossing is the process of creating a three-dimensional image or design on paper or other material. It is accomplished by creating a die, which is then stamped onto the paper, raising the embossed area above the rest of the sheet.
Embossing is often done a company’s logo, names of publications, on product images, or artistic elements.
The embossing can be done with a single-level die, raising everything the same degree. Or a multi-level die can be used, creating a variety of raised levels.
You can emboss a printed image, which is called registered embossing (meaning the embossing is registered to a certain area). Or you can emboss a non-printed area, called blind embossing. Blind embossing is usually done on the cover of a brochure or catalog or on business cards and stationery. Typically it will be an embossed logo, company name or even a product. Debossing uses the same process, except instead of creating a raised effect, a recessed effect is created. Embossing/Debossing is done after the piece has been printed and requires a separate press run.
information was sourced from: http://www.clearprint.com/articles/general/embossing-explained-2
Blind embossing
an embossed image is formed using male and female moulds. Under extreme pressure, these two mould the paper to their shape, creating a multi-dimensional impression. When embosssed, the i
mage is raised; when debossed, the image is below the paper surface.
Embossing dies come in several different styles, each with its own unique appearance.
- A flat die creates a three-dimensional image that is raised above the paper surface; since its edges are straight it produces the most accurate reproduction of black and white line art
- A round die creates a curved image curving out from the paper surface
- Bevelled embossing gives an image with sloping sides and allows for a deeper impression
- Sluptured dies create real dimension by forming the paper to several layers
The best embossing style for an given job will depend on the effect the designer wishes to achieve. important considerations in blind embossing projects include the size, boldness and intricay of the design, as well as the bulk of paper stock to be used. In general , bolder type and larger designs can be embossed more deeply, and heavier papers can achieve greater depth and detail.
I have also looked into how to achieve the best results with your finishing, for example looking at how you can select different stocks to work in combination with your finish, for example blind embossing works much more effectively on a thick pulp substrate.
To achieve the best results when designing for blind embossing...
Blind embossing basically flattens the paper in the embossed area so it is always more effective on textured paper stocks or laid sheets where it creates a contrast in the paper surface.
Line art and typography for embossing should be proofed at reproduction size, care must be taken in spacing type so that letters have room to form.
Because an embossed image is three-dimensional, it may appear slightly smaller than the same image produced by offset or other two-dimensional means. To compensate for this optical illusion, artwork may be prepared slightly bolder or at a slightly larger size.
The style of embossing, or the effect to be achieved, should always be clearly specified with the artwork. Providing a side view of the desired image, or a sample of the type of embossing desired is also useful to the die maker.
Embossing can be successfully combined with other fine print reproduction techniques such as engraving, lithography and foil stamping.
Information sourced from:
http://www.baddeleybrothers.com/print-techniques/blind-embossing
Foil Blocking
These finishes can provide the ultimate in decorative appeal. They are not limited to gold and silver foils, but extend to an impressive range of pigmented,holographic and security foils.
All of these can be combined with embossed images to produce varying tactile effects – any one of which will enhance the printed message and provide shelf appeal for greetings cards, cartons, magazine covers, brochures etc.
A technique where a metallic foil is applied to a specific area of a printed sheet (such as a logo) to create an eye catching shiny effect. The method uses heat and pressure too apply the foil and the result is a much shinier finish than normal Metallic inks. However, it is more expensive as it requires special tools to be made
Offering a metallic finish over fine or larger areas, foil blocking creates something special. You can select matt or gloss foils in gold, silver or other colours and, optionally, make the foiled area stand out with blind embossing.
Our foil blocking is normally laser compatible and suitable for laminated and coated surfaces as well as uncoated.
Its mechanical precision gives you an uncannily accurate portrayal of the subject.
An extensive range of colours and finishes are available from pastels to metallics.
- Highly effective with matt or gloss foils.
- Enhance the effects with blind embossing.
- Most foils are laser compatible.
For opaque coverage and brilliant colour, foil stamping is unparalleled. With its contrasting surface textures and shimmering highlights, foil stamping can spark excitement in a business communciation and bring a static design to life.
To create a foil blocked image an ultra thin polyester film carrying a foil pigment is fed into a press. There, a die of the desired image is pressed against the paper, trapping the film inbetween. As heat to the die and pressure to the paper are applied, the foil or pigment is released from the film carrier and transferred to the paper, forming a foil image.
Foils for stamping are available in a myriad of styles; pearl, opalescent, marbled, wood grained, pastel, full colour, clear, glossy, matte or satin. Foil blocking offers the designer a true metallic finish.
Information sourced from:
http://www.baddeleybrothers.com/print-techniques/foil-blocking
Laminates and varnishes:
Laminates and varnishes are print finishes that are applied to the printed job to add a finishing touch to a surface
Laminate types
a laminate is a layer of plastic that is used as a coating - it is heat sealed onto the stock to produce a smooth and impervious finish and to provide a protective layer to cover the stock. a varnish is a colourless coating that is applied to a printed piece to protect it from wear or smudging, and to enhance the visual appearance of the design or elements within it such as spot varnish:
Gloss Varnishing
| |
A gloss varnish is often used to enhance the appearance of printed photographs in brochures or flyers, as the coating reflects back the light and makes colours appear richer and more vivid. A gloss coating can add impact to your print, especially in sales or promotional material, where optimum presentation of images is paramount. | |
Matte Varnishing
| |
A matte (or matt – the spellings are interchangeable) varnish gives the printed surface a non-glossy, smooth look. This type of seal is sometimes considered to ‘soften’ the appearance of a printed image. Small text in a leaflet or booklet is easier to read on a surface coated with matt vanish as the coating scatters the light, reducing glare. | |
Silk / Satin Varnishing
| |
Naturally enough, this coating represents the ‘middle ground’ between the two above, being neither as glossy as a true gloss, nor as subtle as a matt. | |
Machine Sealing
| |
A machine seal is a basic, and virtually invisible coating applied to a printed item by the printer. It does not affect the appearance of the job, but as it ‘seals’ the ink under a protective coat, the printer need not wait so long for the job to be dry enough to handle. It is often used when producing fast turnaround printing such asleaflets on matt and satin (silk) papers, as inks dry more slowly on these materials. | |
UV Varnishing
| |
Ultra Violet (UV) Varnishing is a process for achieving an even more striking type of coating on your printed material. Requiring the use of special Ultraviolet drying machinery, a UV coating is like a deluxe version of the non-UV varnishes, with the varnish appearing noticeably richer and more luxurious. A UV varnish can be applied as either an all-over coating, or as a spot varnish: | |
All-over UV varnish
| |
Simply put, this is a UV seal applied all over the printed surface. A gloss UV varnish seal is the most common type of all-over UV varnish, (perhaps because this finish really does give a very high gloss effect, more so than with a laminate in many cases) although silk and matt are also available. | |
Spot UV Varnish
| |
As the name suggests, a Spot Varnish is applied to chosen spots (areas), of a printed piece. This has the affect of highlighting and drawing attention to that part of the design, but it also provides the additional visual stimulus of having varied textures on a single printed surface. This adds a lot of interest, and can identify the printing as a premium piece of literature in the perception of the reader.
One very effective technique is to apply a UV gloss spot varnish on top of matt laminated printing. This achieves maximum contrast between the highly reflective shiny UV coating and the light-absorbing matt laminate, and can, for instance, create a striking first impression on presentation folders or a brochure cover.
| |
Textured Spot UV Varnish
| |
In four finishes: Sandpaper, Leather, Crocodile Skin and Raised
A textured spot UV varnish allows the creative designer not only to surprise the recipient of the printing with a mix of textures on the same printed surface, but also to reinforce the tactile properties of the product he or she is depicting. For example, a manufacturer of ornamental glassware could use a raised effect gloss UV varnish to give a highly reflective, 3-dimensional portrayal of a featured piece of glass work, or an interior design company could use a combination of leather, sandpaper or crocodile skin varnishes to highlight some of the different textures the company works with.
Thermography
Thermography adds an exciting new dimension to printed products by producing a raised finish to selected areas, such as a heading or logo, to highlight them. It can also be used as a less expensive alternative to Hot Foil Printing.
Different thermorgraphic powders will produce different finishes.
Popular uses for Thermography include:
| |
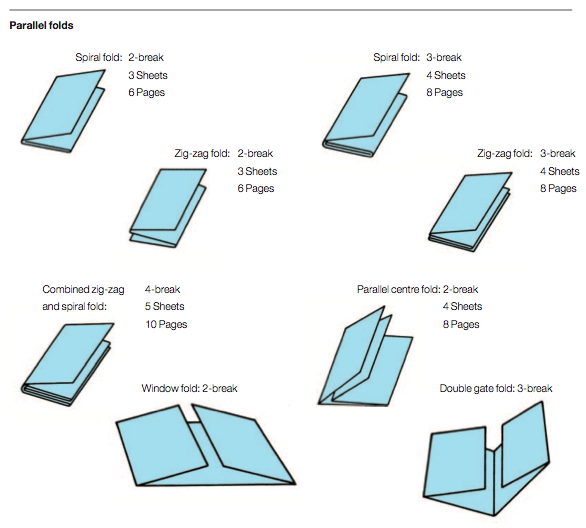
Folding and trimming
folding encompasses a range of different methods for turning a printed sheet into a more compact form
Types of folding technique:
Cutting and creasing
Some printed materials will need to be cut after printing, and, if necessary, creased so that they can be folded. This particularly applies to packaging, but also to pop-up cards and books, and press-out shapes for model making.
A die cutter is the commonest cutting machine. The die supports the material being cut and has a hole or a recess into which a punch made of cutting blades fits exactly. The punch and die are fitted into a punching machine, or sometimes a converted letterpress machine. The work to be cut is fitted into the machine and the punch lowered down to cut. For creasing, the same technique is used, but with blunt blades that will crease the product. Cutting can also be done with a CNC cutter.
Die Cutting can be used to produce different shapes on most papers & boards (including thicker display boards). Also most pockets for folders and apertures are achieved using this process

Print finishing has been explained in an excellent manner in this post. These methods which you have shown seems like excellent and worthy too. The advanced machines introduced nowadays have made these methods even more advanced.
ReplyDelete